Most integration guides walk you through every endpoint in the reference. This one doesn't. A working crypto checkout needs five calls and one webhook — everything else in the API is an upgrade you add later. Below is that minimal path, in the order you'll actually write it, plus the three places where integrations quietly go wrong once real money is moving.
The short version: authenticate with your keys, create a checkout, open a charge for the customer, receive the callback when the payment lands, and reconcile against the API. Endpoint names and fields come from the public CPAY documentation; the code is condensed and illustrative, so check it against the current docs before shipping.
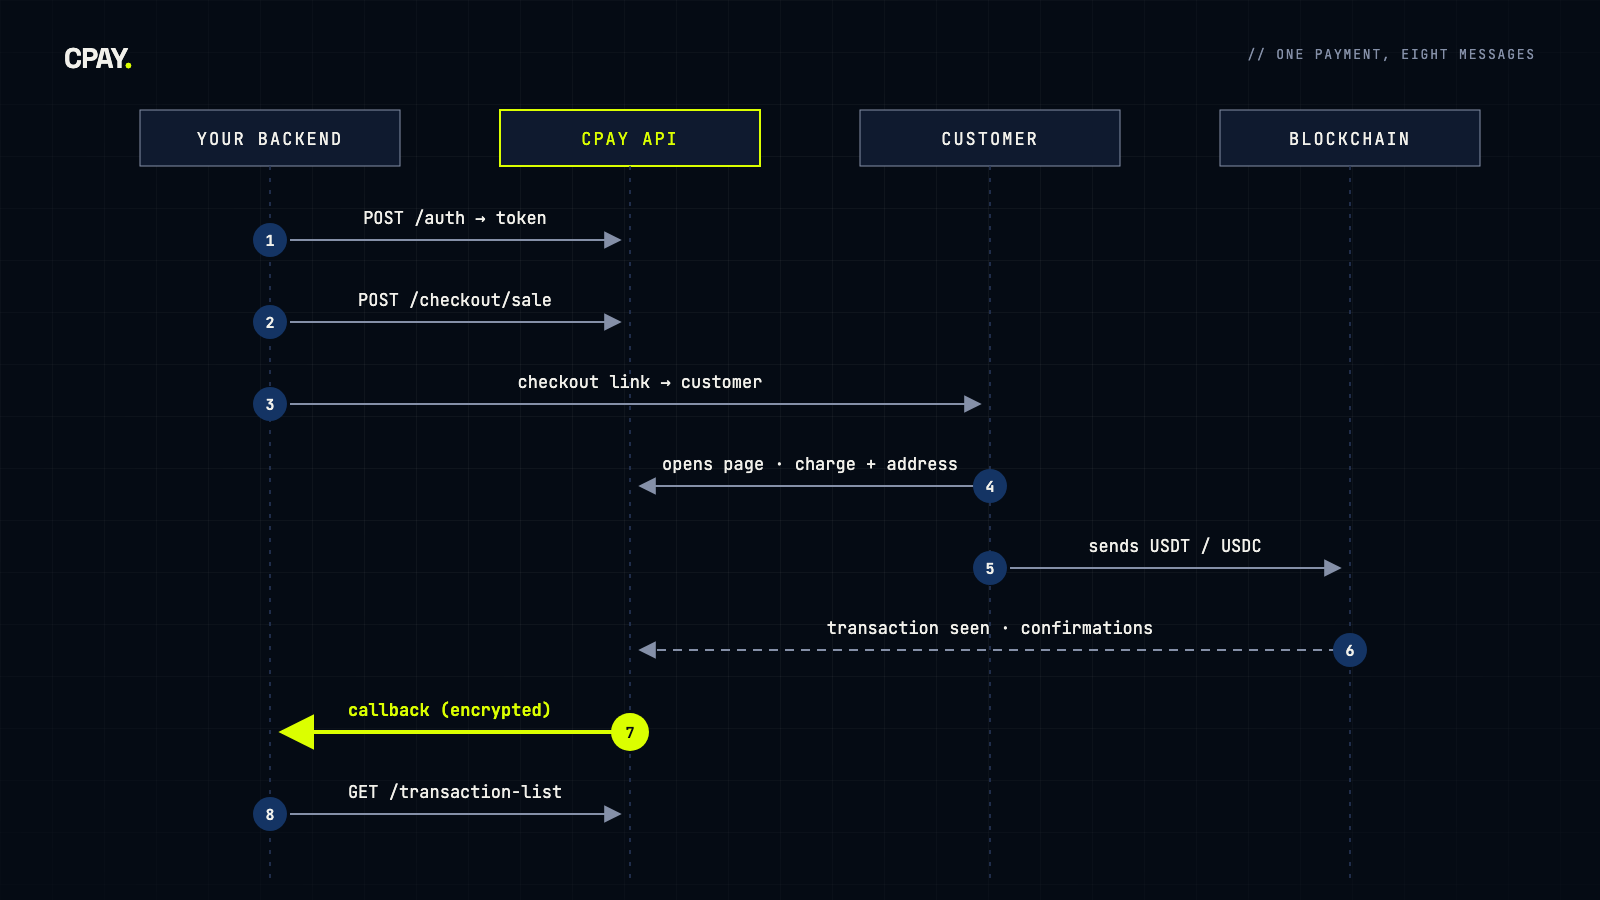
Map — Two doors into one API
CPAY's API is split by who is calling. Your server talks to the account API under /api/public/*, authenticated with your key pair. The customer-facing checkout talks to a separate surface under /api/checkout-client/* — that's what the hosted payment page calls on the customer's behalf. In the other direction, CPAY calls you: a callback to a URL you configure, every time a transaction completes.
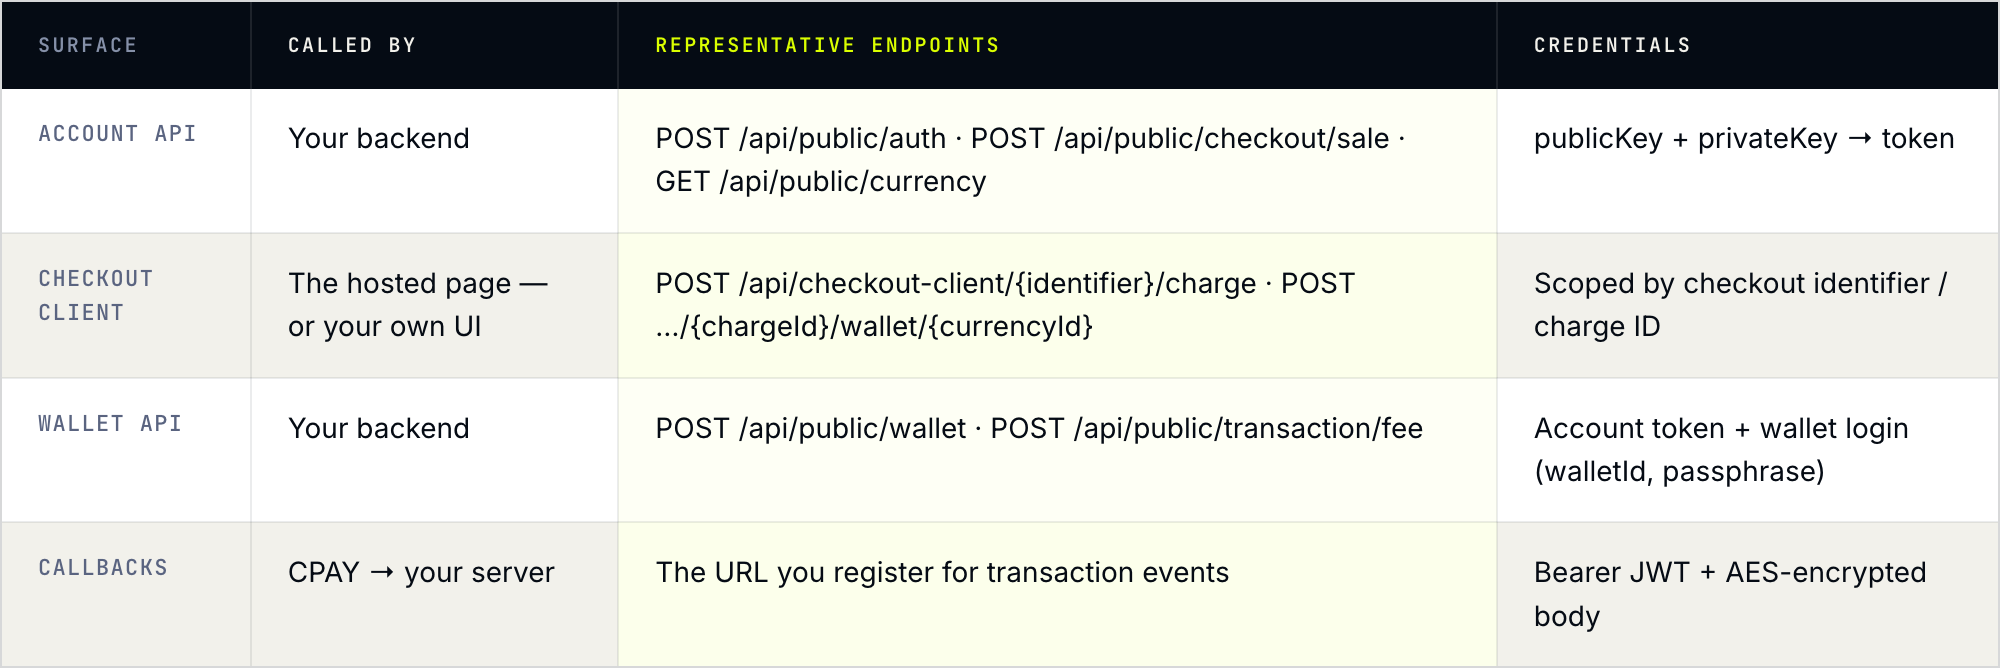
You can drive all of it with plain REST, or through the official Node library, cpay-node-api-sdk, which takes your publicKey and privateKey (plus walletId and passphrase once you start touching wallets). This guide uses raw HTTP so every moving part is visible.
Your private key never leaves your server. It signs you in as the account — keep it in your backend's secret store, not in a mobile bundle, a frontend build variable, or a repository. The same goes for the wallet passphrase that comes back when a wallet is created: treat it as a credential.
Call 1 of 5 — Authenticate: trade your keys for a token
Generate an access key pair in your account settings, then exchange it for a token. Every later account-level call carries that token.
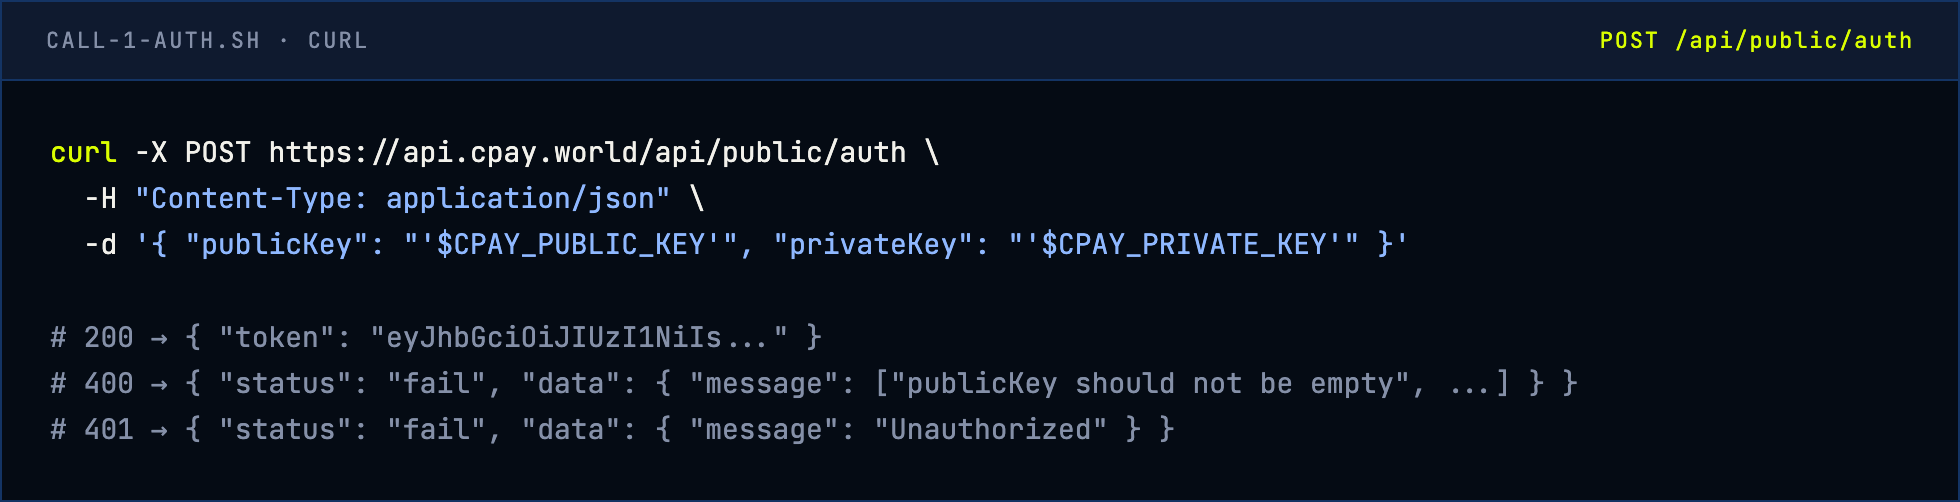
Two habits save you pain here. Cache the token, don't log in per request — the example token in the documentation expires a day after it's issued, but read the exp claim from the token you actually receive instead of hard-coding a lifetime. And treat a 401 as "refresh and retry once", not as an outage: a token that quietly expired overnight looks exactly like an outage until someone reads the status code.
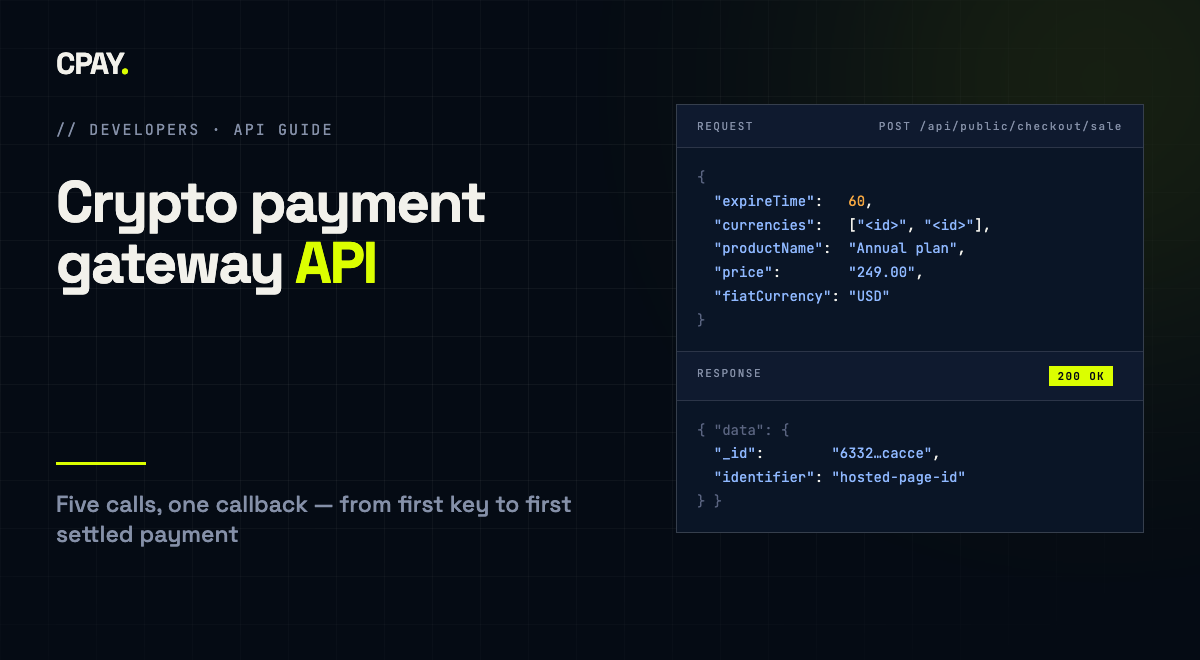
Call 2 of 5 — Create a checkout: describe what you're selling
A checkout is the reusable definition of a payment page: what's being sold, which currencies are accepted, how long a charge stays open. The API offers four shapes, and choosing the right one up front removes a surprising amount of glue code:
- Sale — a fixed product and price in a fiat currency. The right default for one-order-one-payment flows.
- Cart — the amount isn't known when the checkout is created; it's supplied when a charge is opened. Fits stores where the basket changes per customer.
- Donation — the payer chooses the amount. No price field at all.
- Sale token — a token-sale variant with its own estimate endpoint, for projects selling a token rather than goods.
One detail is easy to miss on a first attempt: the currencies field takes currency IDs, not tickers. You fetch the list from GET /api/public/currency — each entry carries _id, name, title, nodeType and currencyType — and match on all of those, not on the ticker alone.
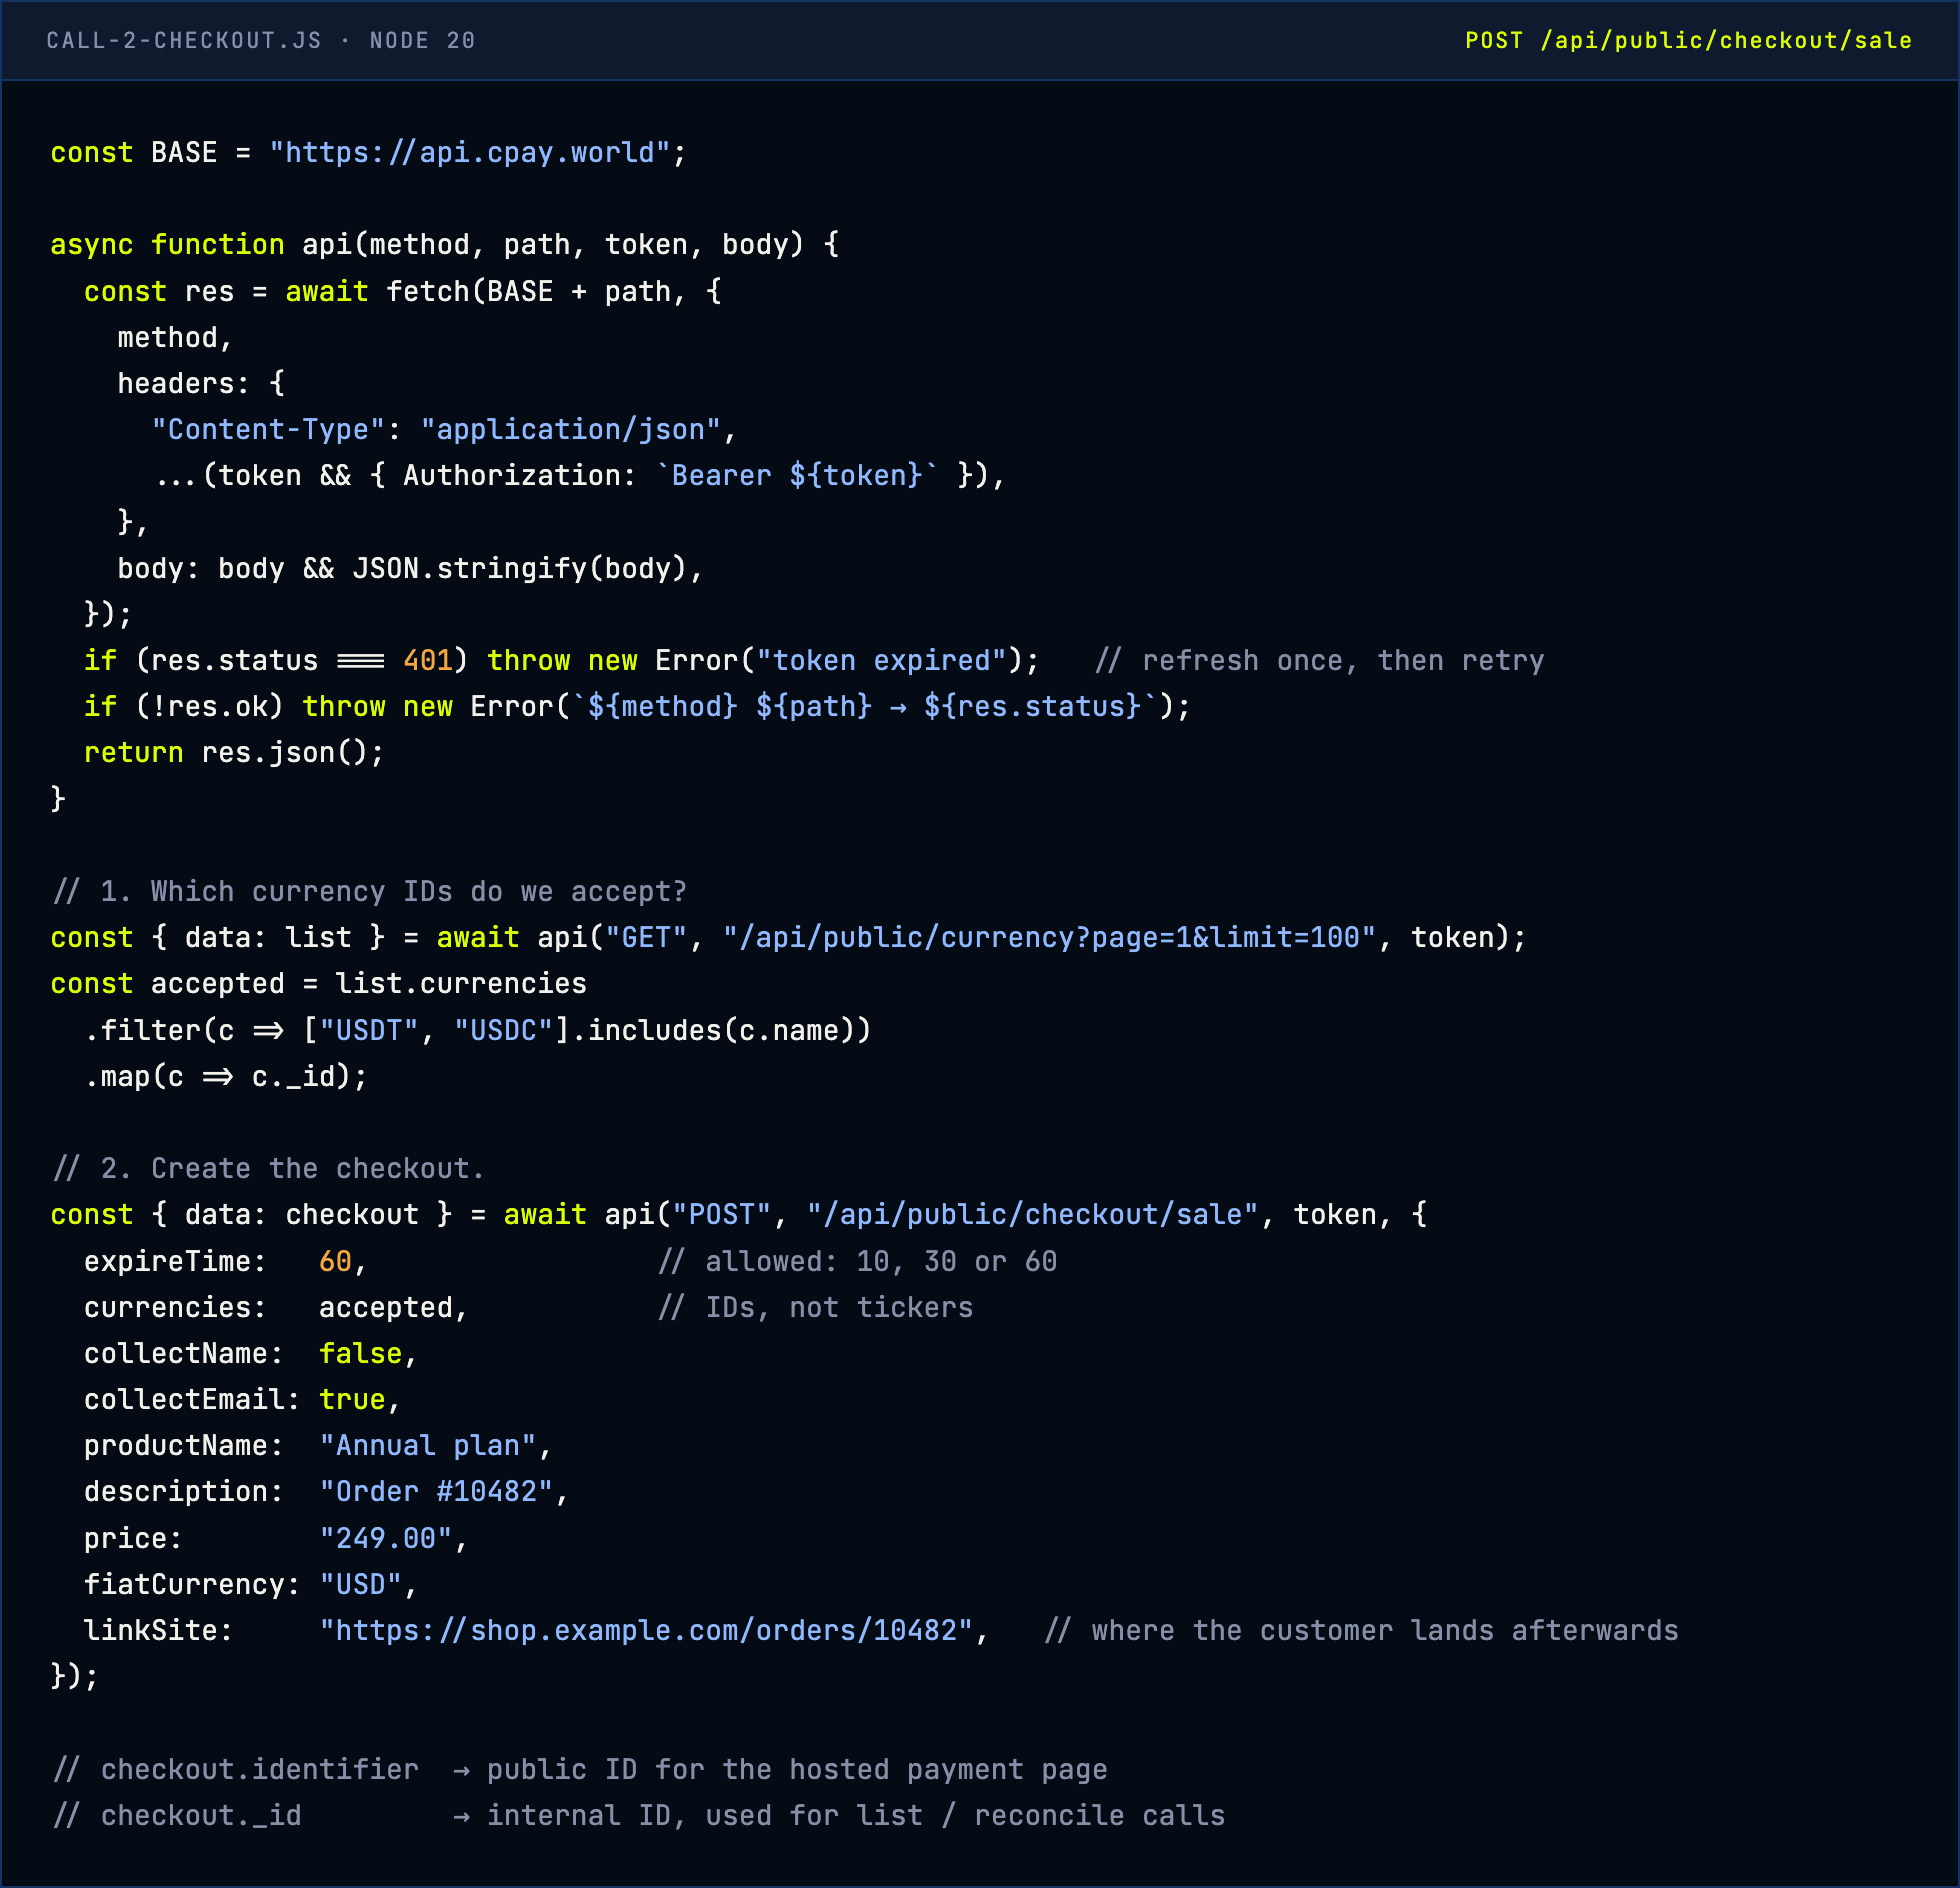
Notice what's missing: no wallet, no address, no deposit watcher. The checkout is only a definition. Addresses appear when a customer actually starts paying — which is the next call.
A webhook tells you something happened. The API tells you what is true. Be fast because of the first, be correct because of the second.
Call 3 of 5 — Open a charge: hosted page, or your own UI
A charge is one customer's attempt to pay against a checkout. There are two ways to get there, and they differ in how much work you take on.
The hosted route. Send the customer to the checkout page. The widget does everything below on its own — it requests a charge, shows the currencies you enabled, generates the payment address, and watches for the transaction. Your backend only creates the checkout and listens for the result. For most teams this is the entire front-end integration.
The custom-UI route. Call the checkout-client endpoints yourself and render the payment screen in your own product. Opening a charge returns a chargeId; a second request returns the charge's full state. By default CPAY creates a wallet for every enabled currency up front — pass createWallet=false and create one only after the customer picks, which keeps a six-currency checkout from minting six addresses nobody will use.
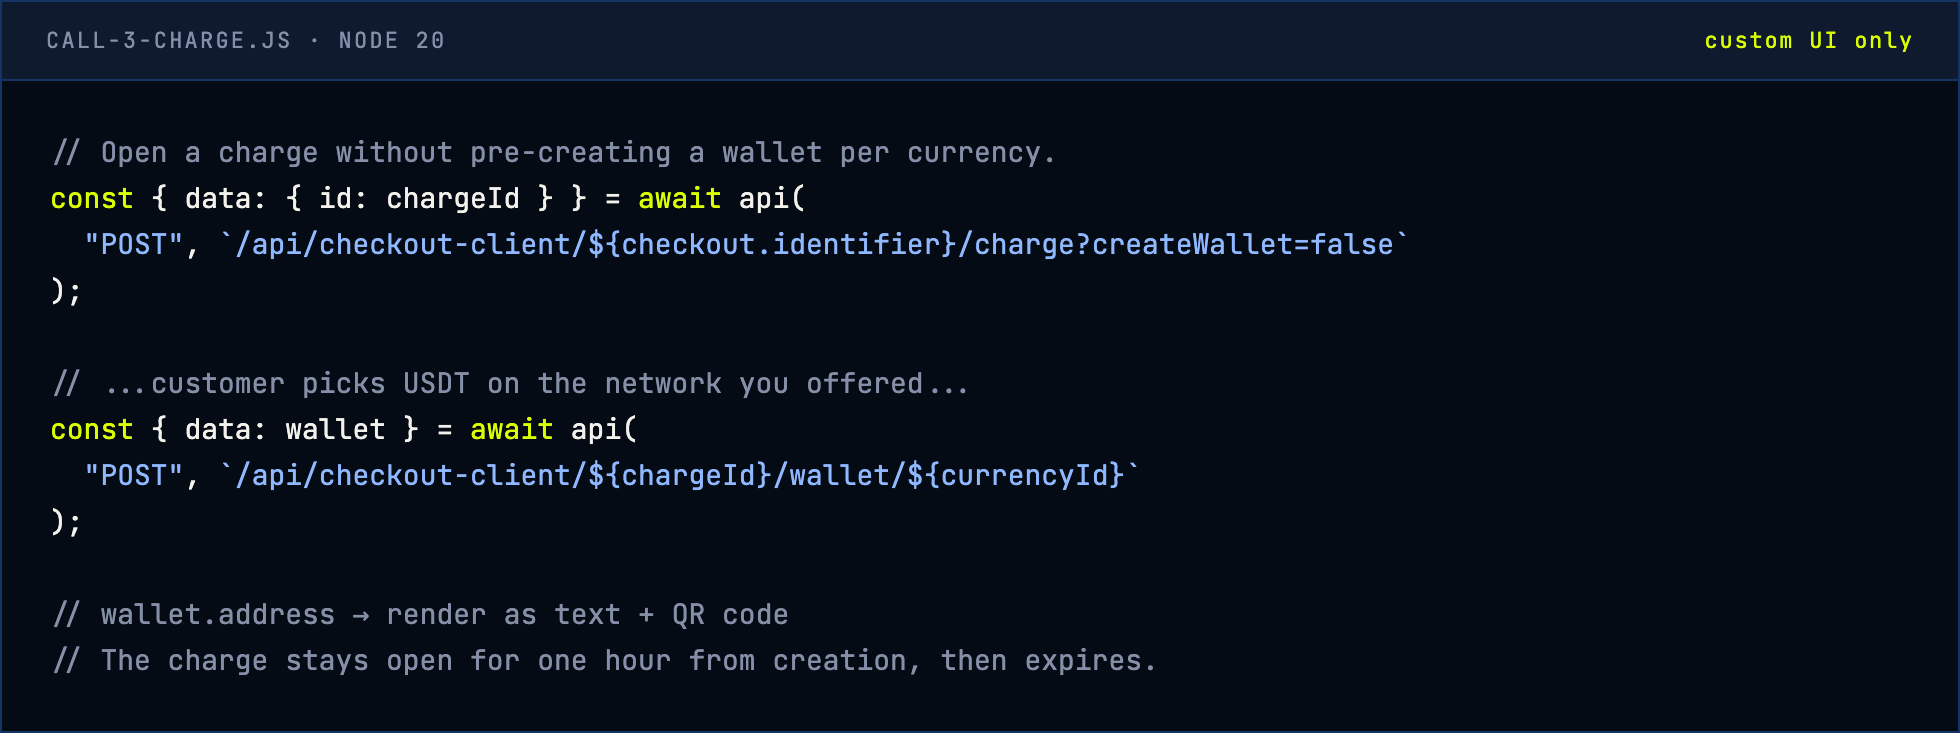
Why does a charge expire? Crypto payments are push payments: the customer sends funds whenever they like and nothing on the receiving side can pull. CPAY therefore watches each network for the payment and, per the documentation, treats a charge as expired one hour after creation. Your UI should show a visible countdown — and your order logic should decide in advance what happens to money that arrives late.
Call 4 of 5 — Receive the callback: the message everything hangs on
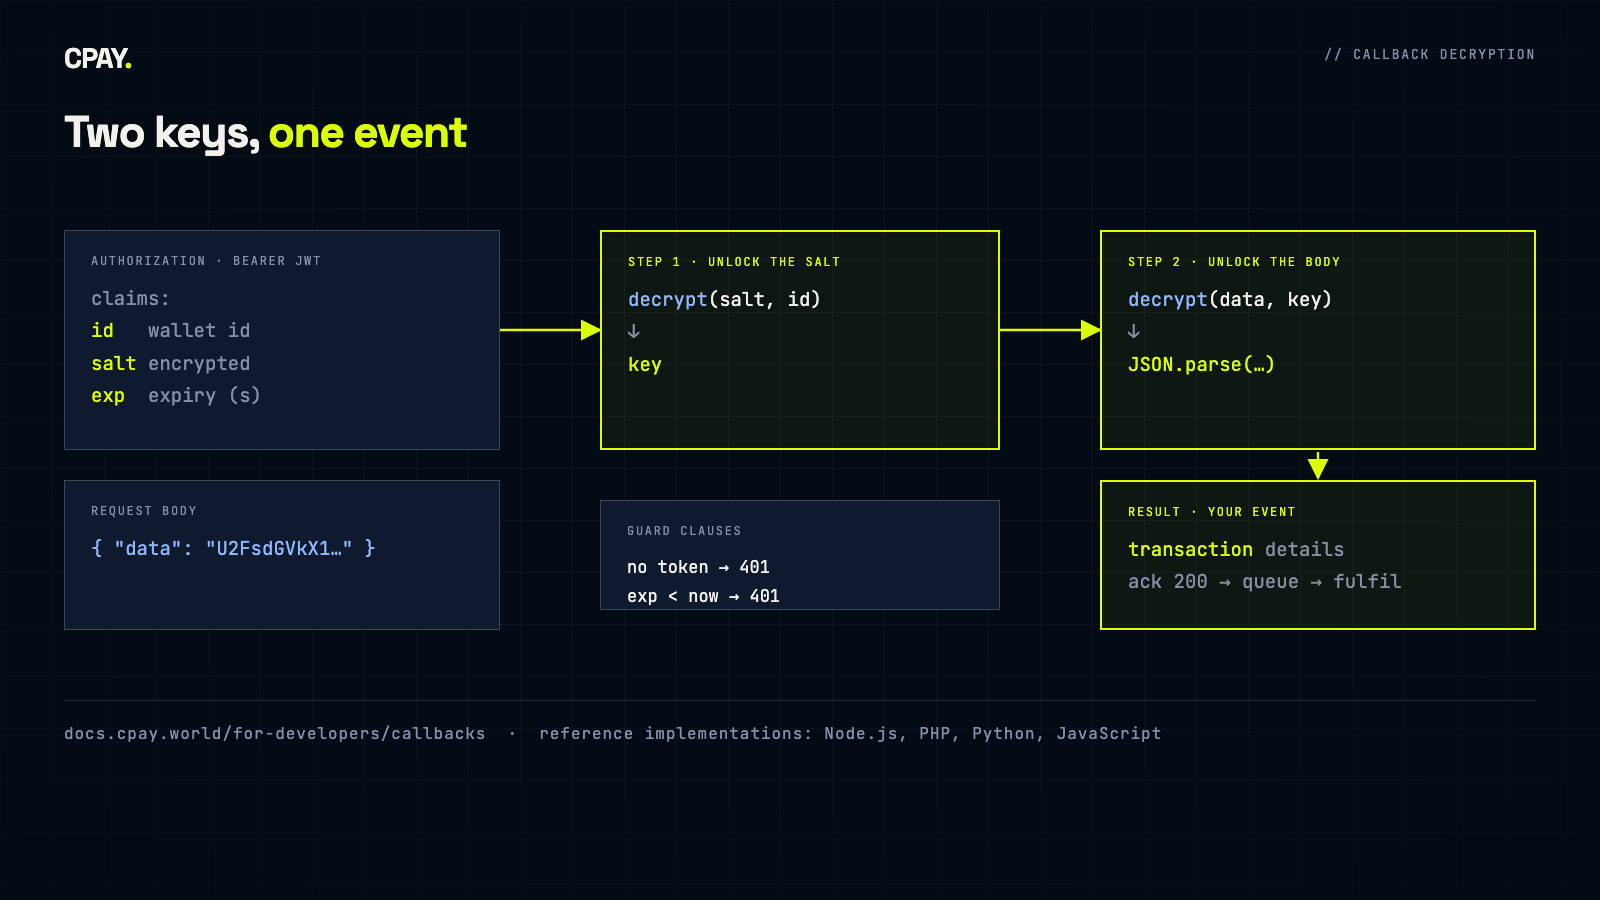
When a transaction completes, CPAY sends a request to the callback URL you registered. Two things make it different from the webhooks you may be used to: the request carries a Bearer JWT whose claims include a wallet id, a salt and an expiry; and the body arrives as a single AES-encrypted data field rather than readable JSON.
Decoding it is a two-stage unlock: the wallet ID decrypts the salt from the token, and that salt decrypts the body. The documentation ships reference implementations in Node.js, PHP, Python and JavaScript; here is the Node shape, condensed into an Express handler.
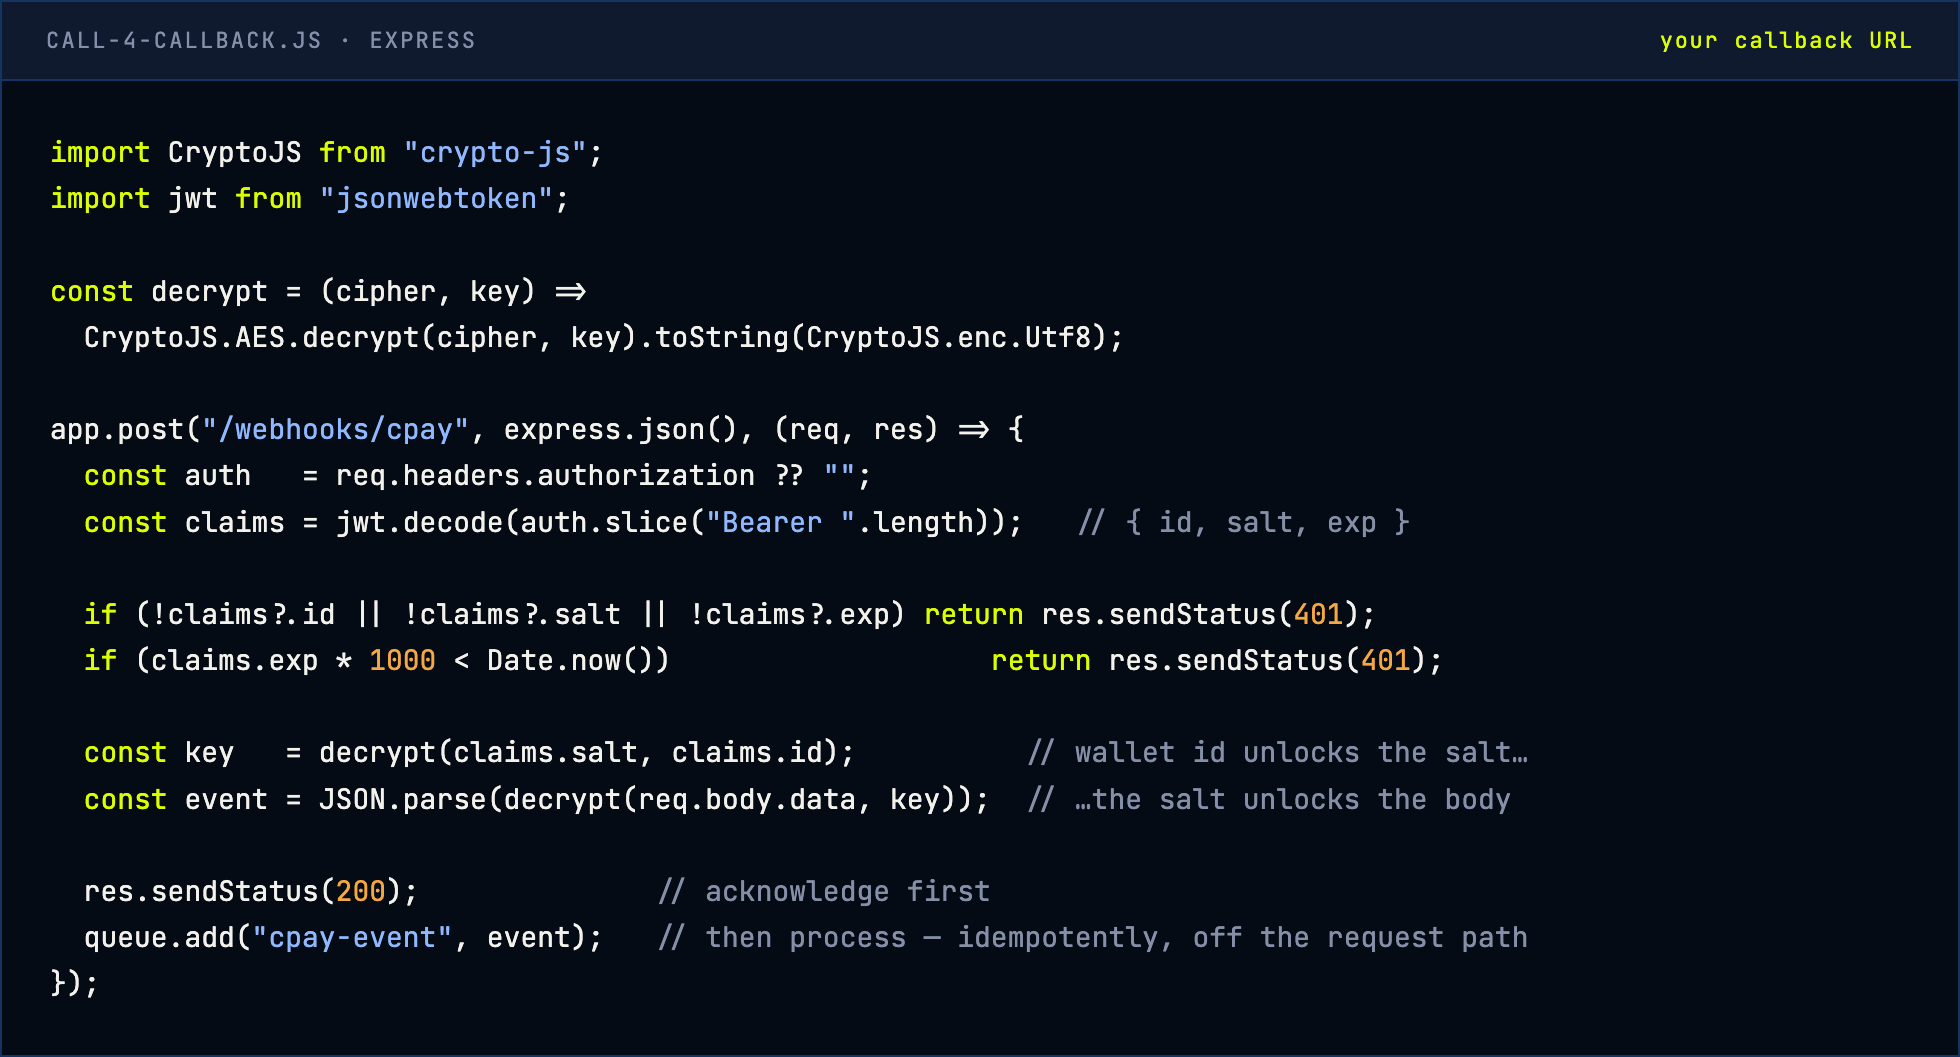
The last two lines are our recommendation rather than part of the reference code, and they matter more than the decryption. Acknowledge quickly and do the real work off the request path — a slow handler that times out is indistinguishable, from the sender's side, from a dead one. And write the handler so the same event can arrive twice without shipping the order twice: key your fulfilment on the transaction, not on the arrival. For retry behaviour and the exact event fields, read the current callbacks page rather than assuming.
Call 5 of 5 — Reconcile: don't trust a single message
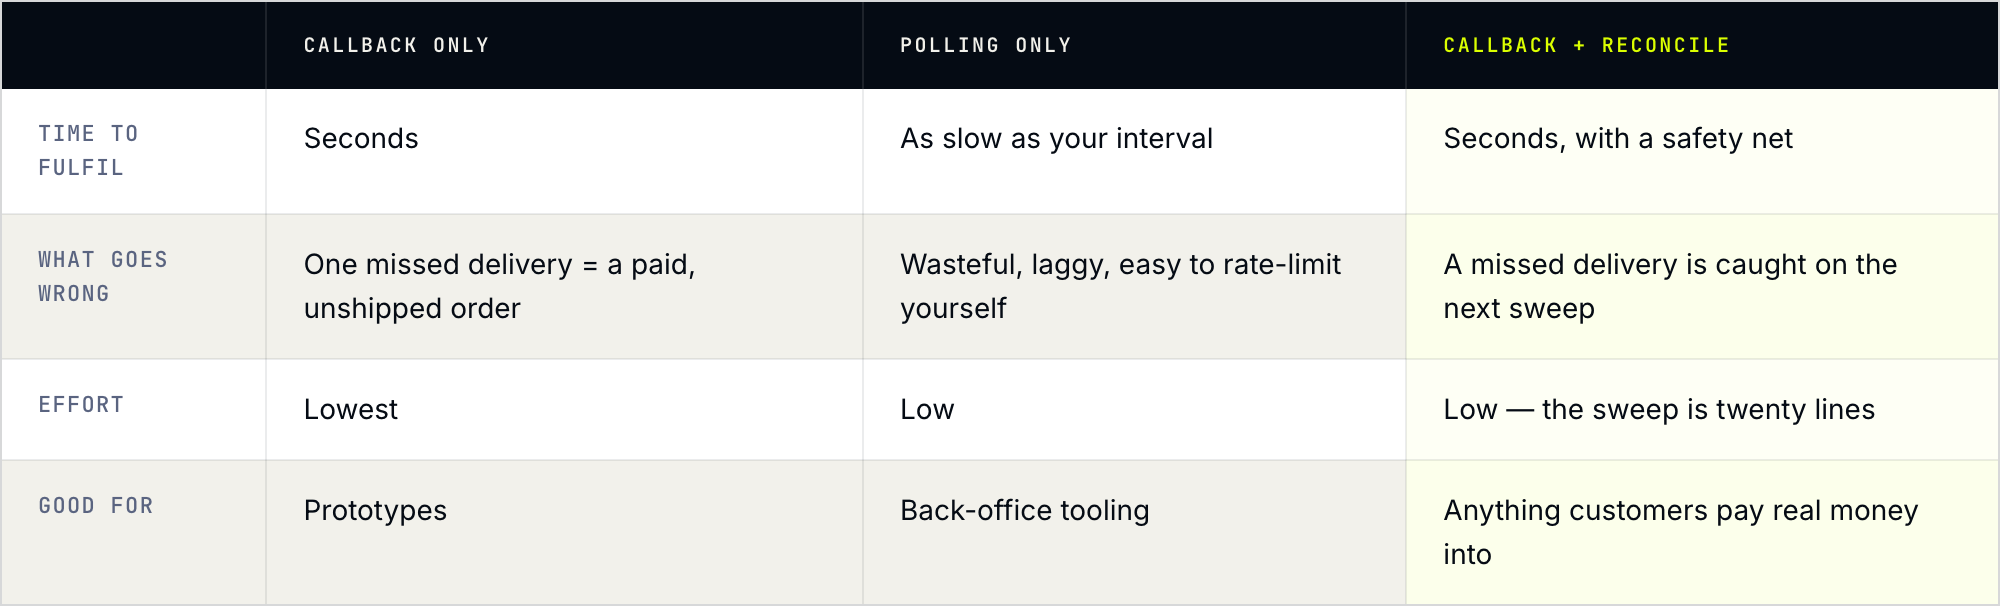
The fifth call is the one teams skip, and it's the one that makes the integration boring in the best way. For each checkout you can list its charges and its transactions — GET /api/public/checkout/{checkoutId}/charge-list and …/transaction-list — and compare that against your own orders table on a schedule.
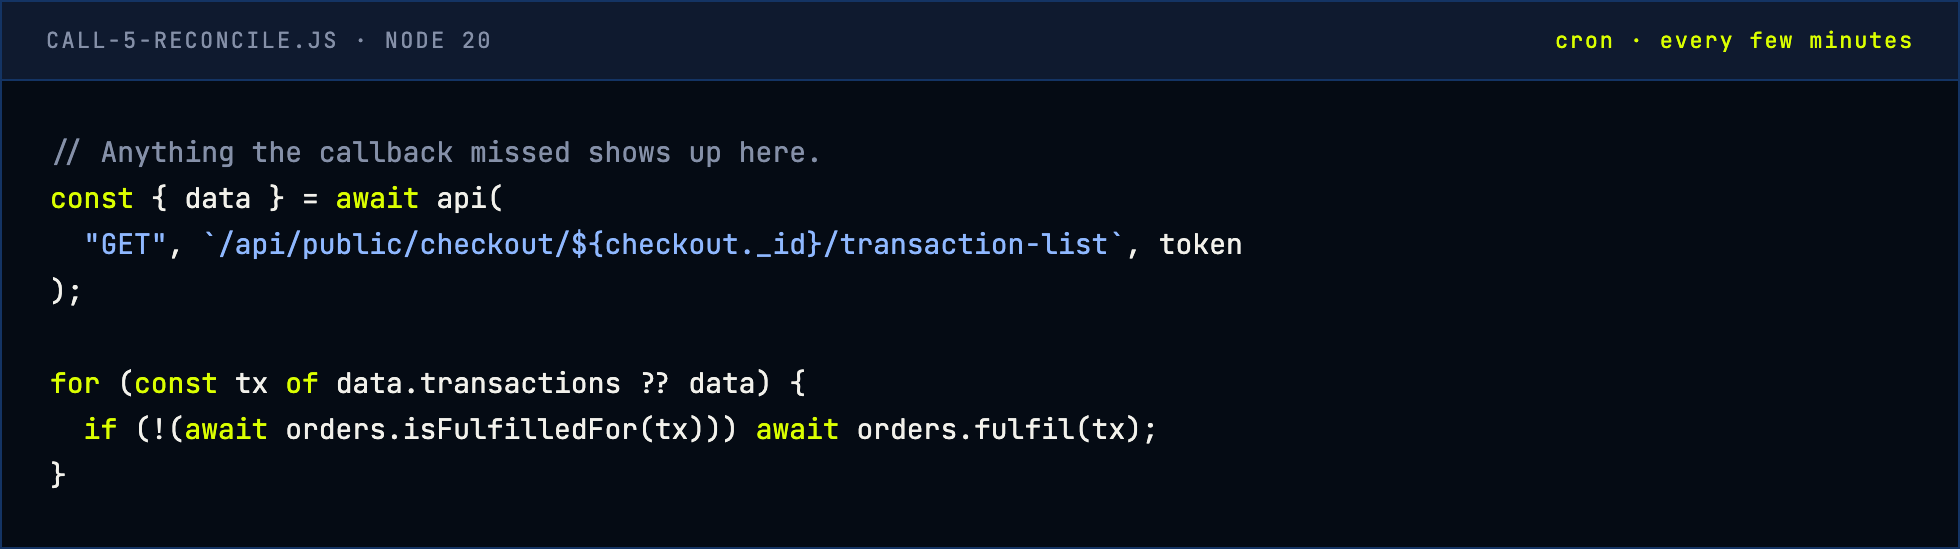
This isn't redundancy for its own sake. A callback and a poll fail in different ways, and running both covers the gap between them:
Field notes — Three quiet failures
None of these show up in a happy-path demo. All of them show up in the first weeks of live traffic.
- Hard-coded currency IDs. It's tempting to paste the IDs from your first response into a config file and forget them. Fetch them from the currency endpoint at startup (or cache with a refresh), and match on name and network type — otherwise the day a currency is added or retired, your checkout quietly offers the wrong list.
- Late and mismatched payments. The charge is open for an hour; customers are not that punctual. Decide, before launch, what your system does with a transaction that arrives after expiry or for a different amount than the order — manual review queue, auto-refund path, support macro — and confirm in the docs how such cases are reported.
- The non-idempotent handler. A callback processed twice that fulfils twice is a real-money bug, and it hides until retries or replays happen. Make "have I already handled this transaction?" the first line of your processing function, backed by a unique constraint in the database rather than an in-memory check.
Beyond payments — What else the same keys unlock
Once the five-call path is stable, the rest of the API reads as extensions of the same pattern: log in, call, handle the result. The reference groups them by job — wallets (single- and multi-currency wallets, fee estimation before a withdrawal), recurring billing (plan and subscription lookups), swap and multisend (convert assets or pay many recipients in one operation), external contract calls (read a contract, estimate a write, sign one), and wallet security (password and auto-signing controls). If your product needs wallets rather than just checkout, the wallet API is the natural next stop, and the WaaS API guide picks up where this one ends.
Go-live checklist — Before real money moves
- Secrets are server-side only. No private key and no wallet passphrase in any client bundle or log line.
- Token caching and refresh are in place; a 401 triggers one re-login and one retry.
- Currency IDs come from the API, not from a pasted constant.
- The callback endpoint is reachable over HTTPS, answers fast, and rejects missing, malformed or expired tokens.
- Fulfilment is idempotent and protected by a database-level unique key on the transaction.
- A reconcile job runs on a schedule and alerts on any paid-but-unfulfilled order.
- Expiry is visible to the customer (countdown) and handled in your order state machine.
- Late and mismatched payments have an owner and a documented path — before the first one arrives.
- One real end-to-end payment has been made with a small amount and traced through every step above.
FAQ — Common follow-ups
Do I need the SDK, or is REST enough?
REST is enough — every call in this guide is a plain HTTP request. The Node SDK (cpay-node-api-sdk) is a convenience wrapper that takes your key pair, plus a wallet ID and passphrase for wallet operations. Use it if you're on Node and want less boilerplate; skip it if you're on another stack.
Hosted checkout or custom UI — which should I start with?
Start hosted. It gets you to a real, paid test order with the least code, and the widget handles currency selection, address display and payment watching. Move to a custom UI only when the payment screen has to live inside your own product experience — the backend half (checkout, callback, reconcile) stays identical either way.
How long is a charge valid?
Per the documentation, a charge expires one hour after creation. The checkout's expireTime field takes 10, 30 or 60. Build your UI countdown and your late-payment policy around that window.
Which languages have callback-decryption examples?
The callbacks page includes reference implementations for Node.js, PHP, Python and JavaScript. The flow is the same in all of them: decode the Bearer token, check its claims and expiry, derive the key from the salt, then decrypt the body.
Which fiat currencies can I price in?
The reference lists several, including USD, EUR, and the USDT and USDC stablecoins. Copy the exact accepted strings from the current checkout documentation rather than from memory — the field is validated against a fixed list, and a typo returns a 400.
Ready to build? Generate your keys, create a checkout, and take a first payment — the API documentation has the full reference, and the CPAY team is a call away when you get stuck.
Sources: CPAY Documentation — Integration in your system, Using API for checkout, Callbacks.